
What's Inside My Home Lab?
What's actually running in my home lab and how I built it all for under $70. From K3s clusters on VMs to self-hosted services with proper HTTPS - a complete walkthrough of my personal infrastructure.

Picture this: It's 2 AM, and I'm staring at my AWS bill with a mix of horror and fascination. Another $100 gone, just for experimenting with some Kubernetes deployments and testing a few CI/CD pipelines. As a DevOps engineer, I live and breathe infrastructure, but those cloud costs were eating into my wallet faster than I could learn.
That's when it hit me – why not bring the cloud home?
Why I Built a Home Lab ?
Let me be honest with you. Home labbing isn't just a hobby; it's an addiction. It's that irresistible urge to understand how things really work beneath the abstractions of managed services and cloud platforms. When you're in DevOps, SRE, or any infrastructure role, you quickly realize that reading documentation only gets you so far. You need to feel the pain of a failed deployment, experience the satisfaction of a perfectly configured load balancer, and yes, even troubleshoot why your DNS is acting up at 3 AM.
A home lab gives you something precious: a consequence-free environment where breaking things is not just acceptable, it's encouraged. No angry Slack messages, no incident reports, just pure learning through experimentation.
But here's the real kicker, it's addictive. Once you taste the freedom of having your own infrastructure, you'll find yourself constantly thinking: "What if I add another node?" or "Maybe I should try that new monitoring stack." Before you know it, you're explaining to your family why the internet cabinet now sounds like a small data center.
The Hardware Setup
My journey started with a simple principle: maximum learning for minimum cost. After getting burned by those cloud bills, I was determined to build something sustainable.
One of the most cost-effective parts of my setup is a second-hand Dell OptiPlex 7040 Small Form factor (SFF) PC I found for just ₹4,000 (around $50). To complement it, I added two Raspberry Pis, each costing about $10, complete with a 3-month replacement warranty, 4GB of RAM, and a 32GB SanDisk memory card and all for ₹1,600 ($20).
This little machine packs some serious punch:
- Intel i5 6th generation processor with Intel® HD Graphics 630
- 32GB DDR4 RAM (I upgraded this myself)
- 512GB Samsung 980 NVMe SSD for the OS and using as root drive
- 2TB SATA SSD for data and VM storage
Then there are my two Raspberry Pi 4B companions. One sits at home with a 32GB SanDisk SD card, while its sibling lives at my relative's house with 64GB storage. Why the geographic distribution? Well, what's the fun in a home lab without some multi-site complexity?
The total hardware investment? Around $70 USD. Compare that to a few months of serious cloud experimentation, and you'll see why this made sense.
Networking and Connectivity
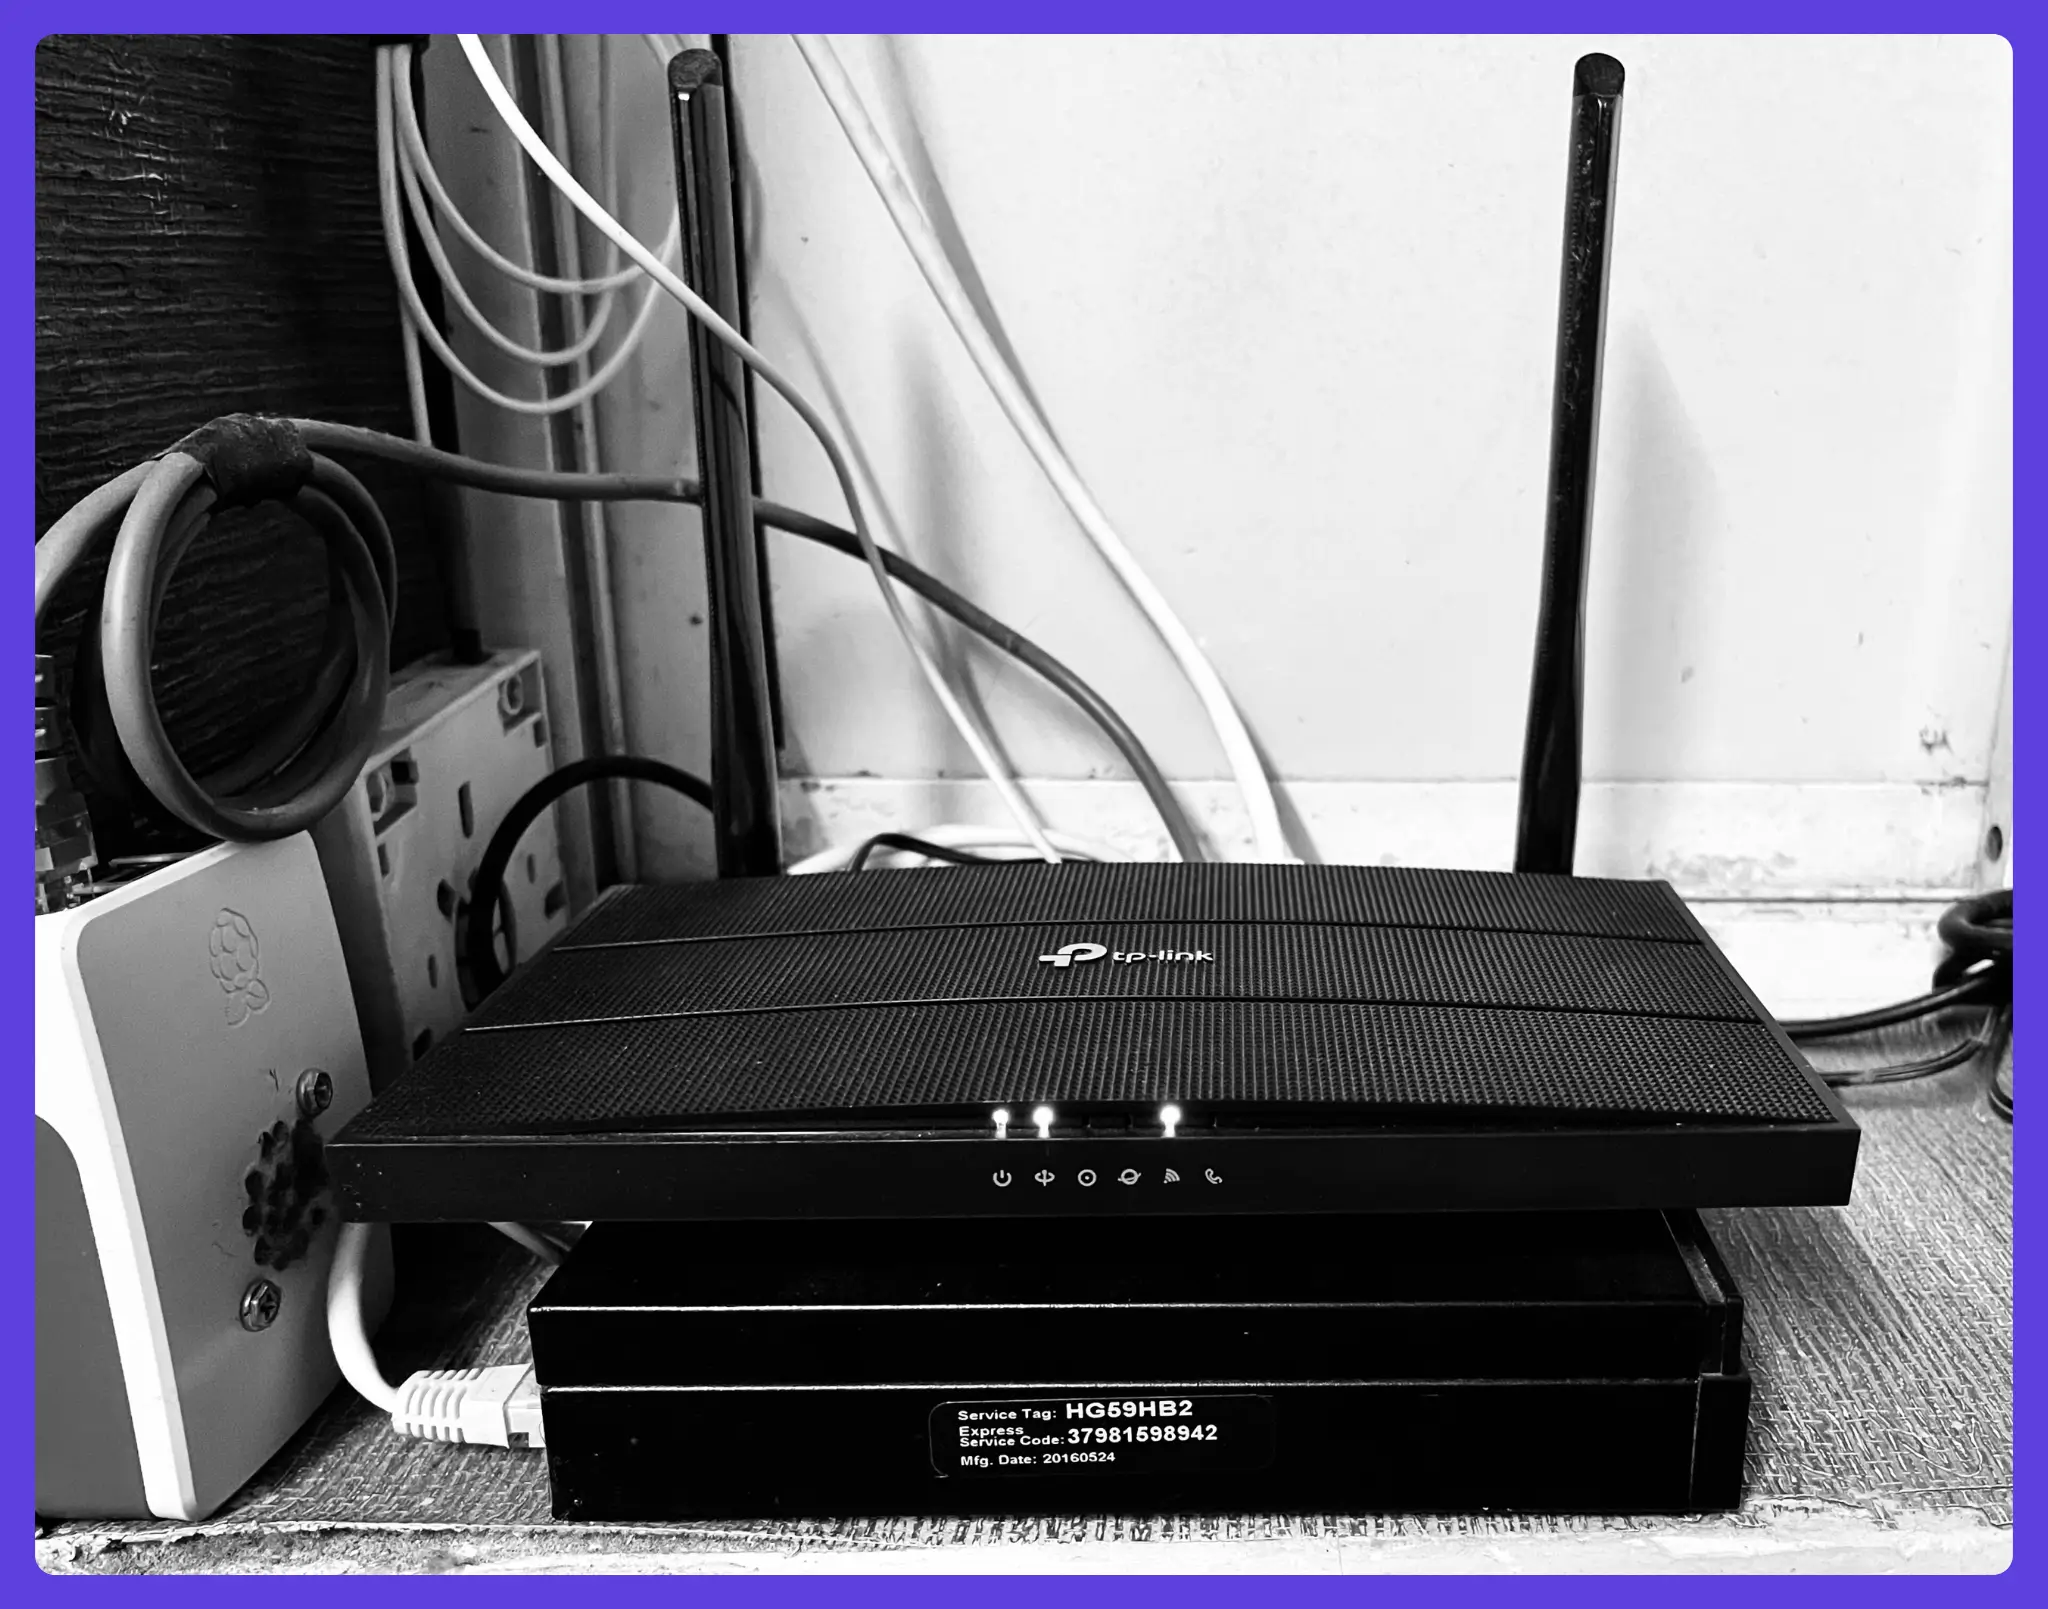
Here's where things get interesting. My home setup runs on a TP-Link router with gigabit connections throughout. I invested in a dedicated public IP from my ISP, about 1,800 rupees ($20) annually. This gives me the flexibility to expose services properly and experiment with different networking configurations.

The real magic happens with Tailscale. Initially, I planned to use WireGuard for connecting my distributed nodes. But after considering the config management overhead like generating keys, distributing configs, maintaining connections this is headache for me so I opted for Tailscale instead.
Tailscale creates a mesh network between all my devices. My home setup uses Tailscale's subnet router feature to expose my entire LAN network, while the remote Raspberry Pi connects seamlessly from across the city. The beauty? No exposed ports, no complex firewall rules, just secure, encrypted communication between all nodes.
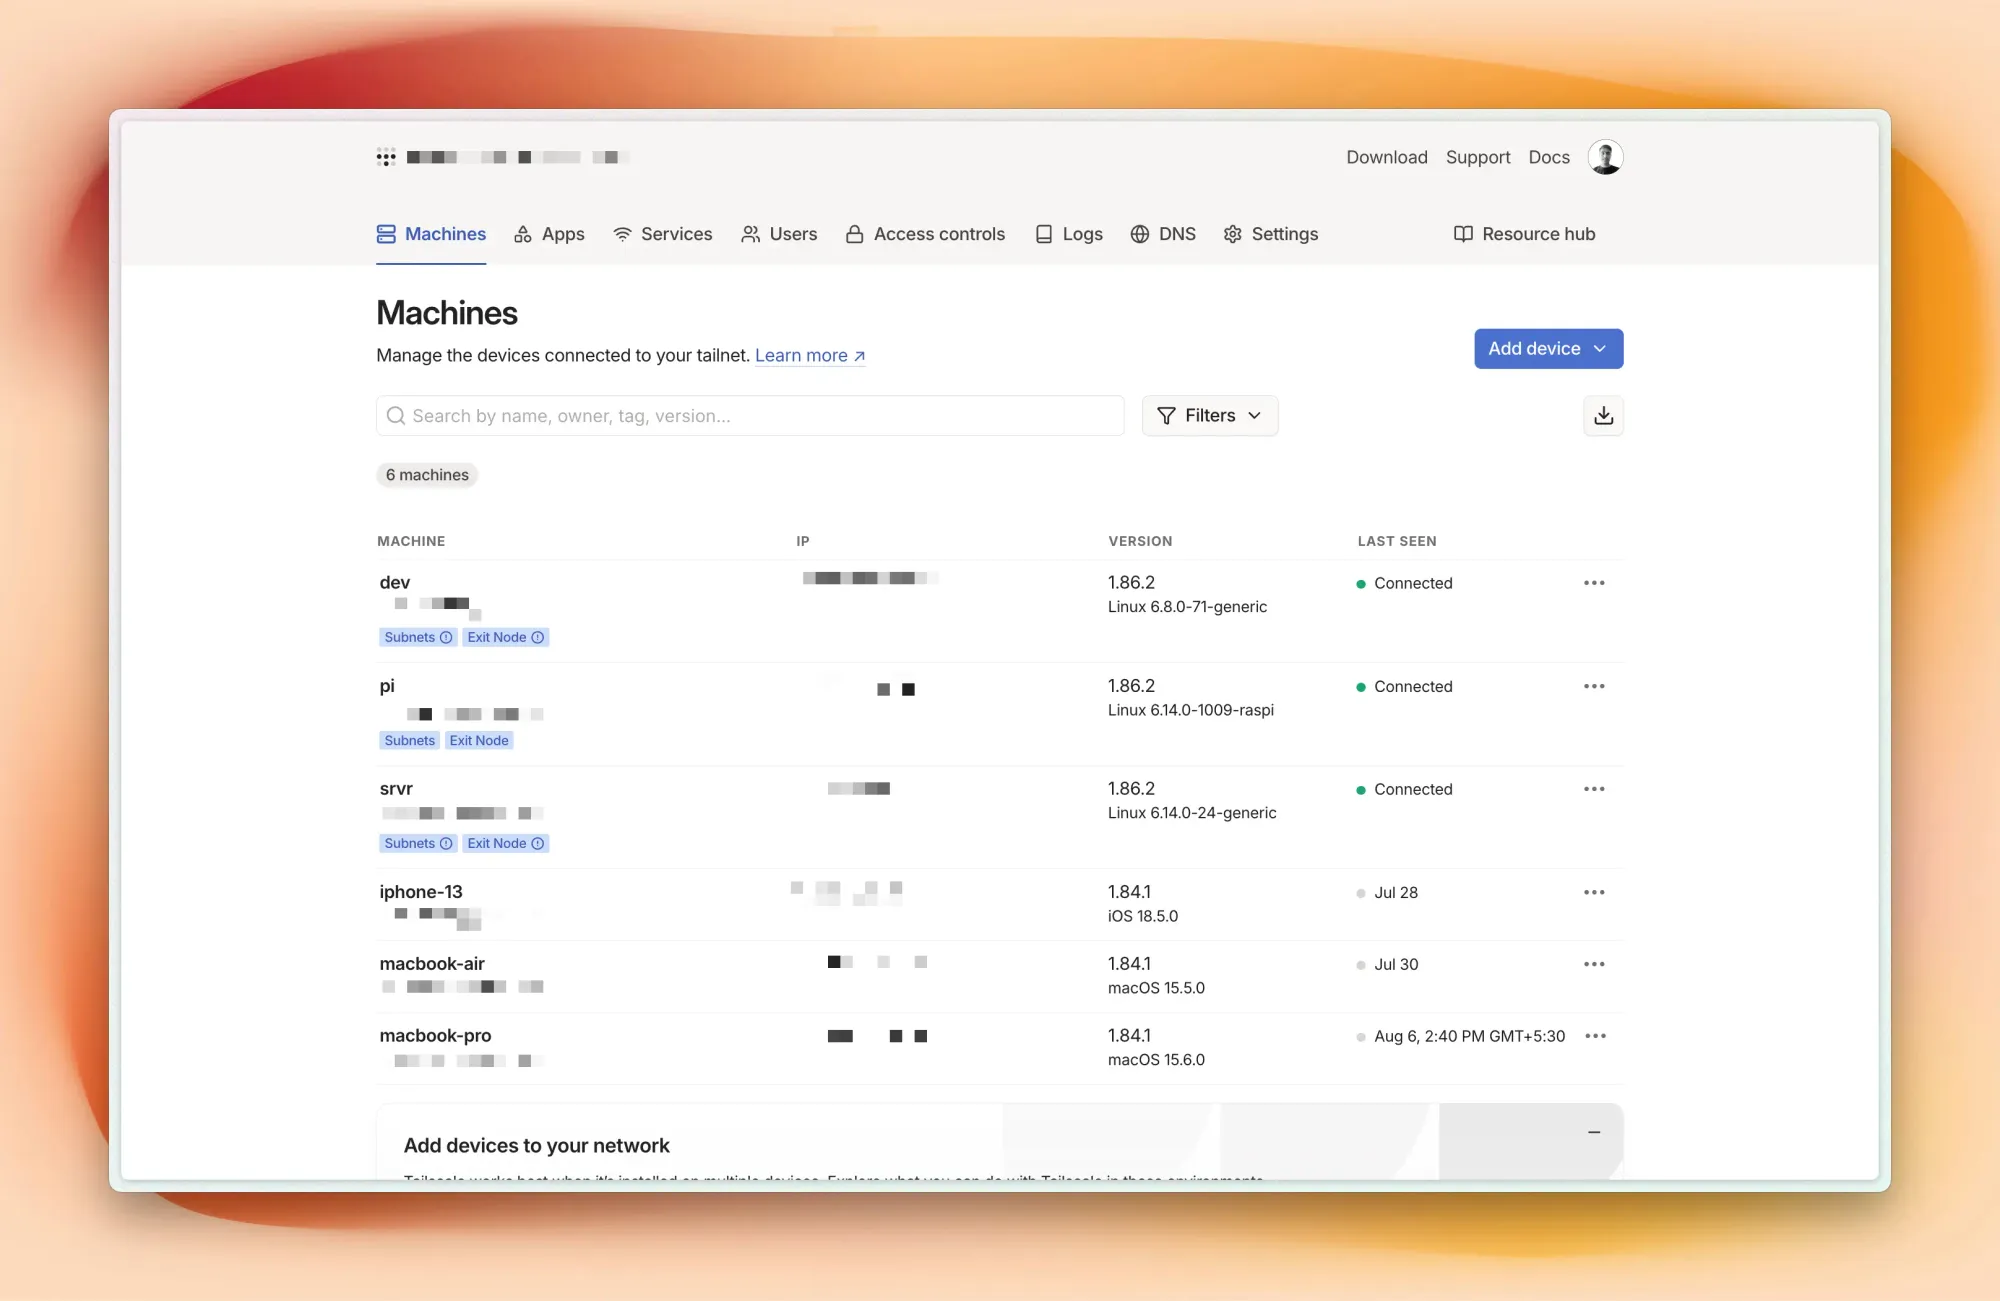
The ease of management sold me completely. Instead of juggling WireGuard configs across multiple devices, I just setup Tailscale on each machine with pre auth tokens, and they instantly see each other. It's like having a private cloud network that spans locations.
Running VMs with QEMU
Here's where my home lab really comes alive. With only two physical nodes, I needed a way to create a realistic multi-node environment for learning.

I use QEMU-KVM as the hypervisor to run virtual machines with Ubuntu cloud-based images, and I leverage cloud-init for automated setup. For the initial configuration, such as creating users, adding SSH keys, and setting up the network with a static IP, I use Cockpit. Cockpit is a great tool for managing servers.
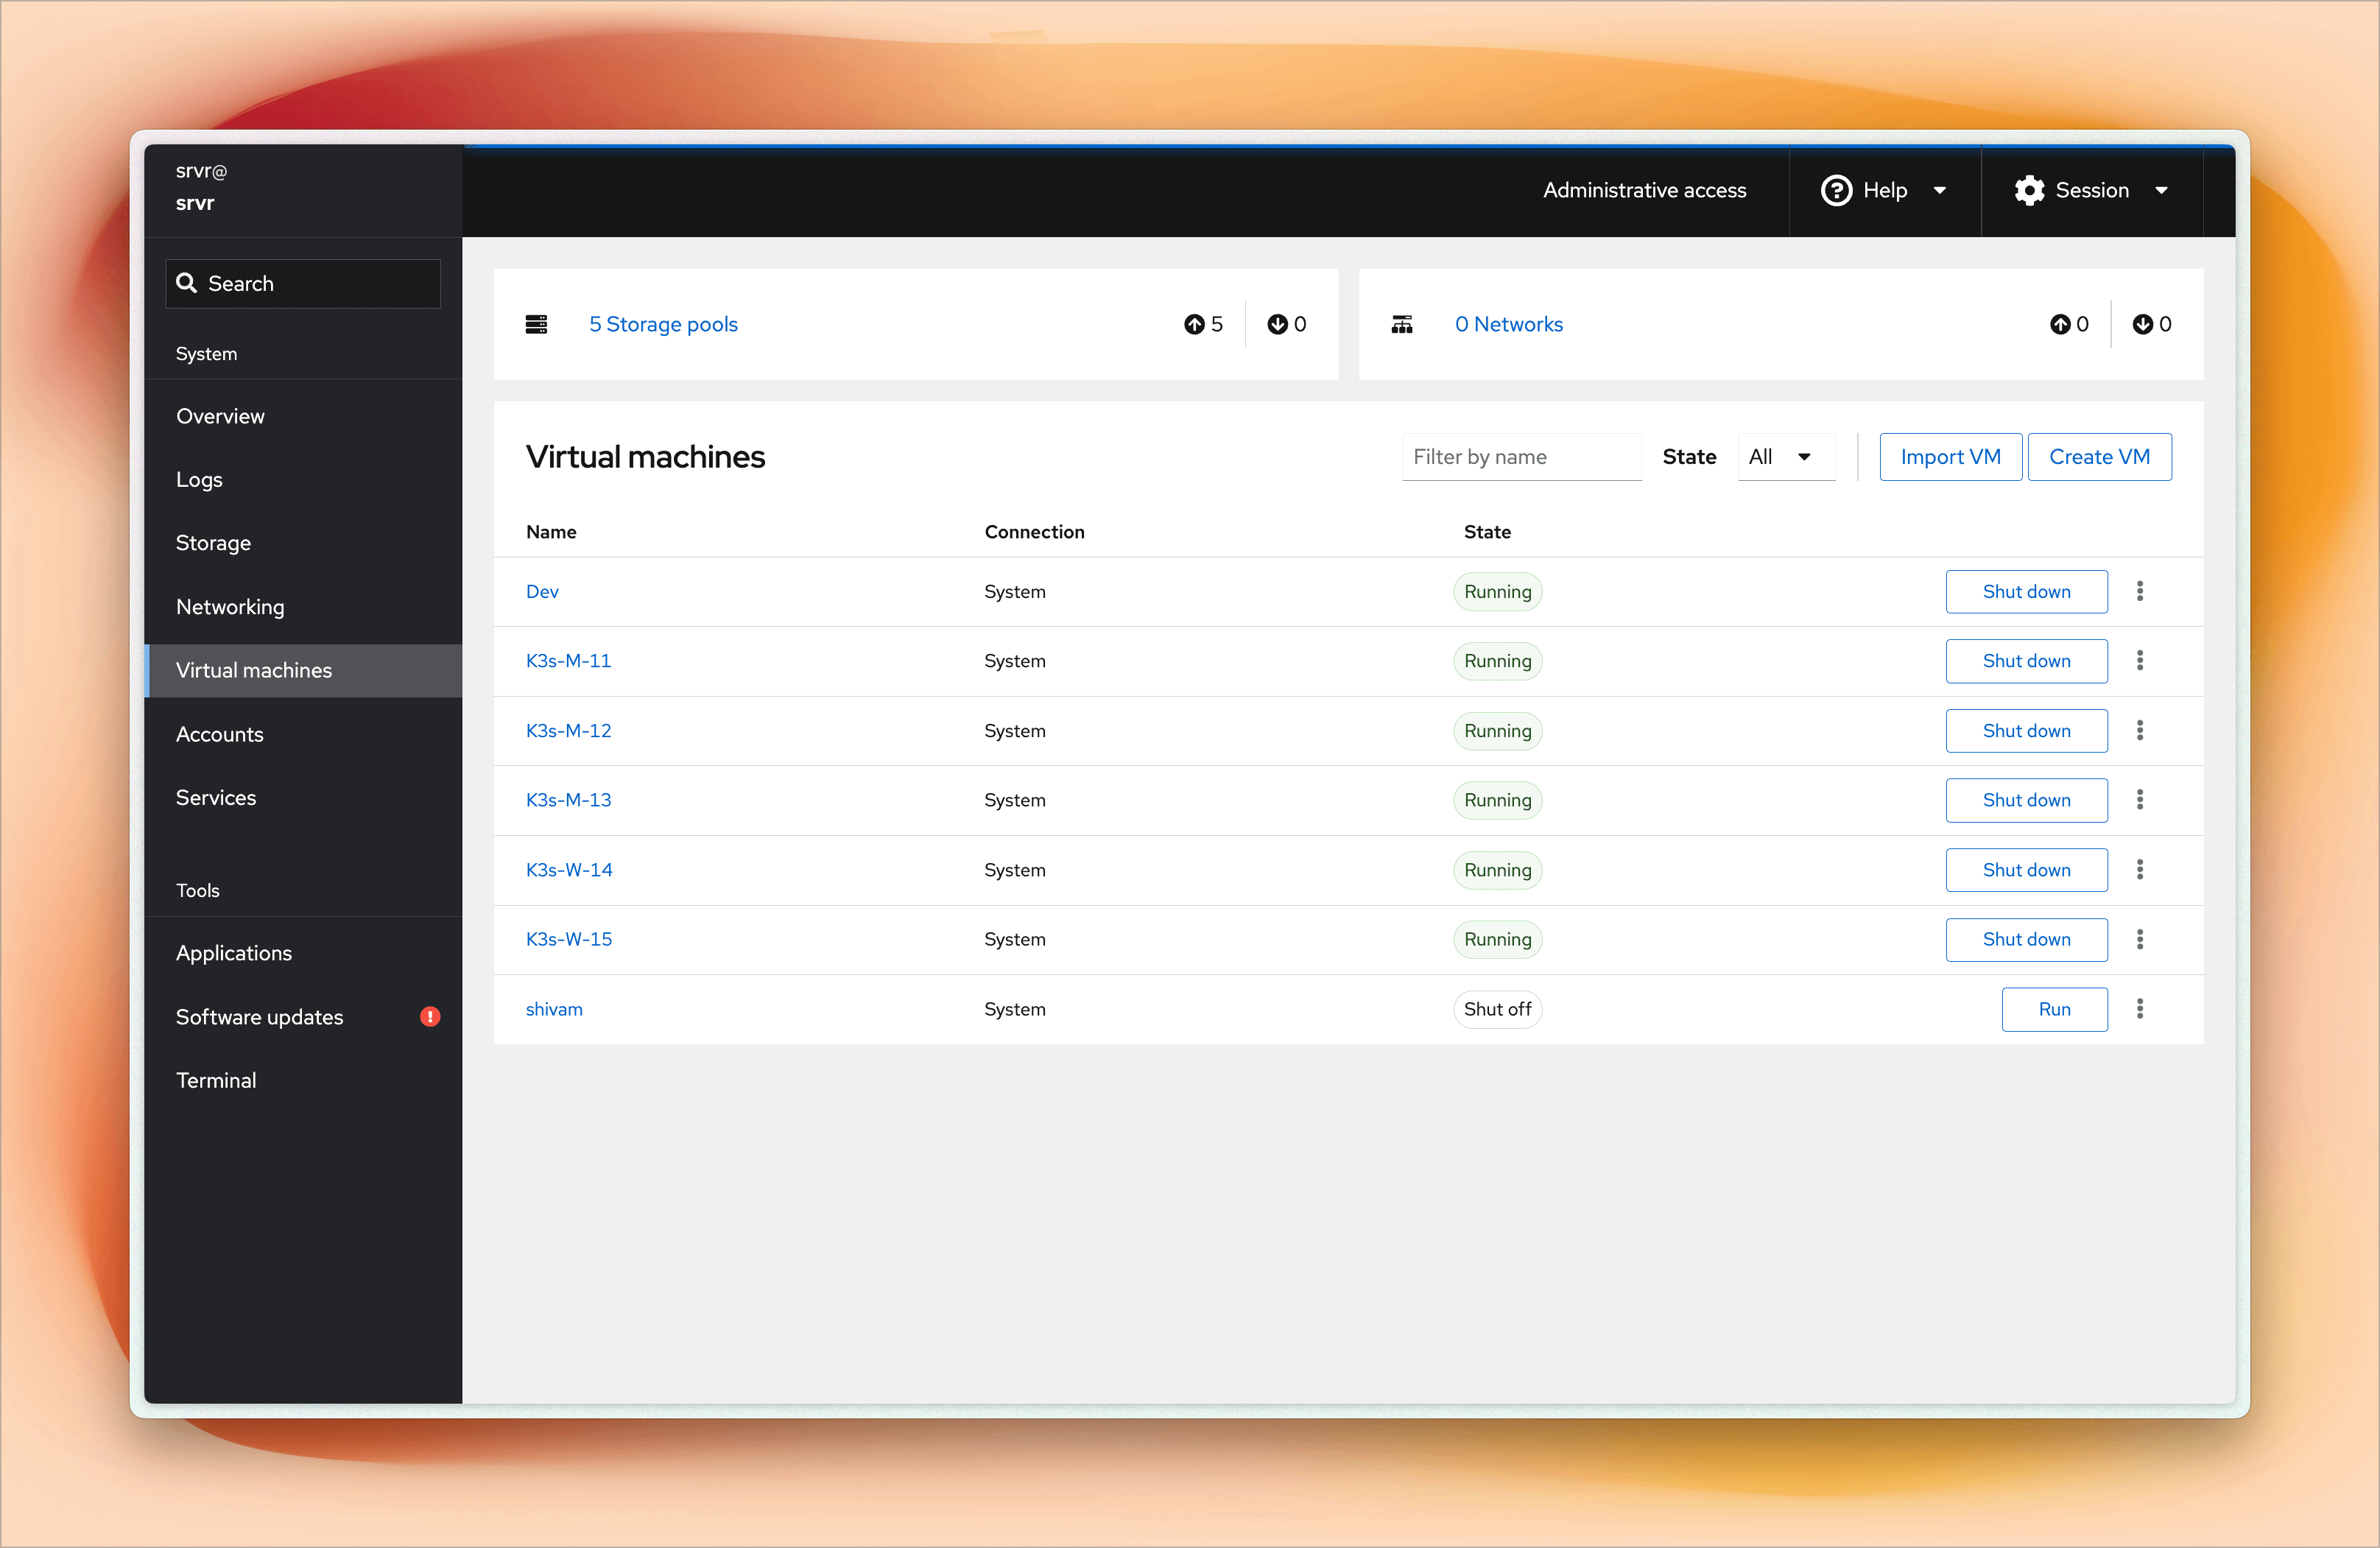
As you can see in the screenshots, I can easily manage virtual machines, monitor system resources, create or delete users, add SSH keys, and check the overall health of the system.
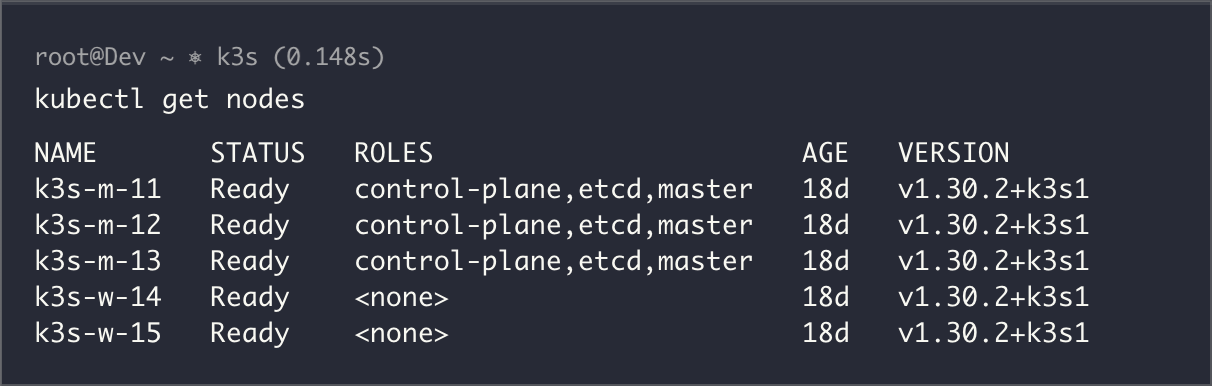
I run five virtual machines on the Dell OptiPlex each with 2 CPU cores, 4GB RAM, 100GB of storage.
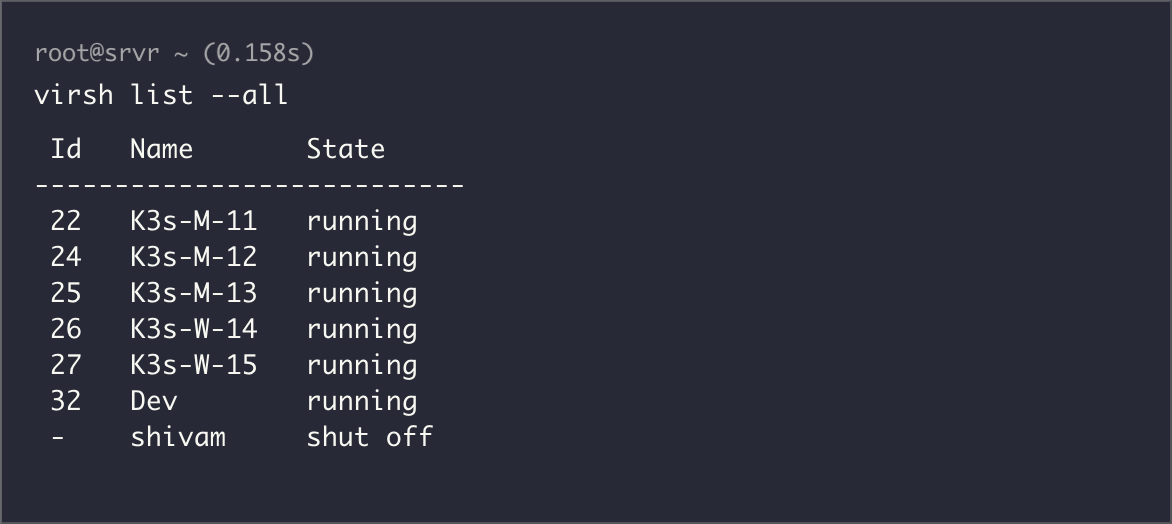
- 3 Master nodes
- 2 Worker nodes
This configuration gives me a proper mini Kubernetes cluster with realistic resource constraints. Each VM runs Ubuntu Server, and the resource allocation ensures I can simulate real-world scenarios without overwhelming my physical hardware.
Why this specific setup? In production, you want odd numbers of master nodes for etcd quorum, and having separate workers lets me experiment with node affinity, taints, tolerations, and all those Kubernetes concepts that only make sense when you have multiple nodes to work with.
My Kubernetes Setup
Running full Kubernetes on resource-constrained hardware is like trying to fit an elephant in a Mini Cooper. That's why I chose K3s, Rancher's lightweight Kubernetes distribution. It gives me the complete Kubernetes API and functionality while being designed exactly for setups like mine.
K3s strips out the bloat while keeping everything you need for learning and development. It uses SQLite instead of etcd for single-node setups (though my cluster uses etcd), includes Traefik as the default ingress controller but i'm not using that, and comes with a built-in service load balancer.
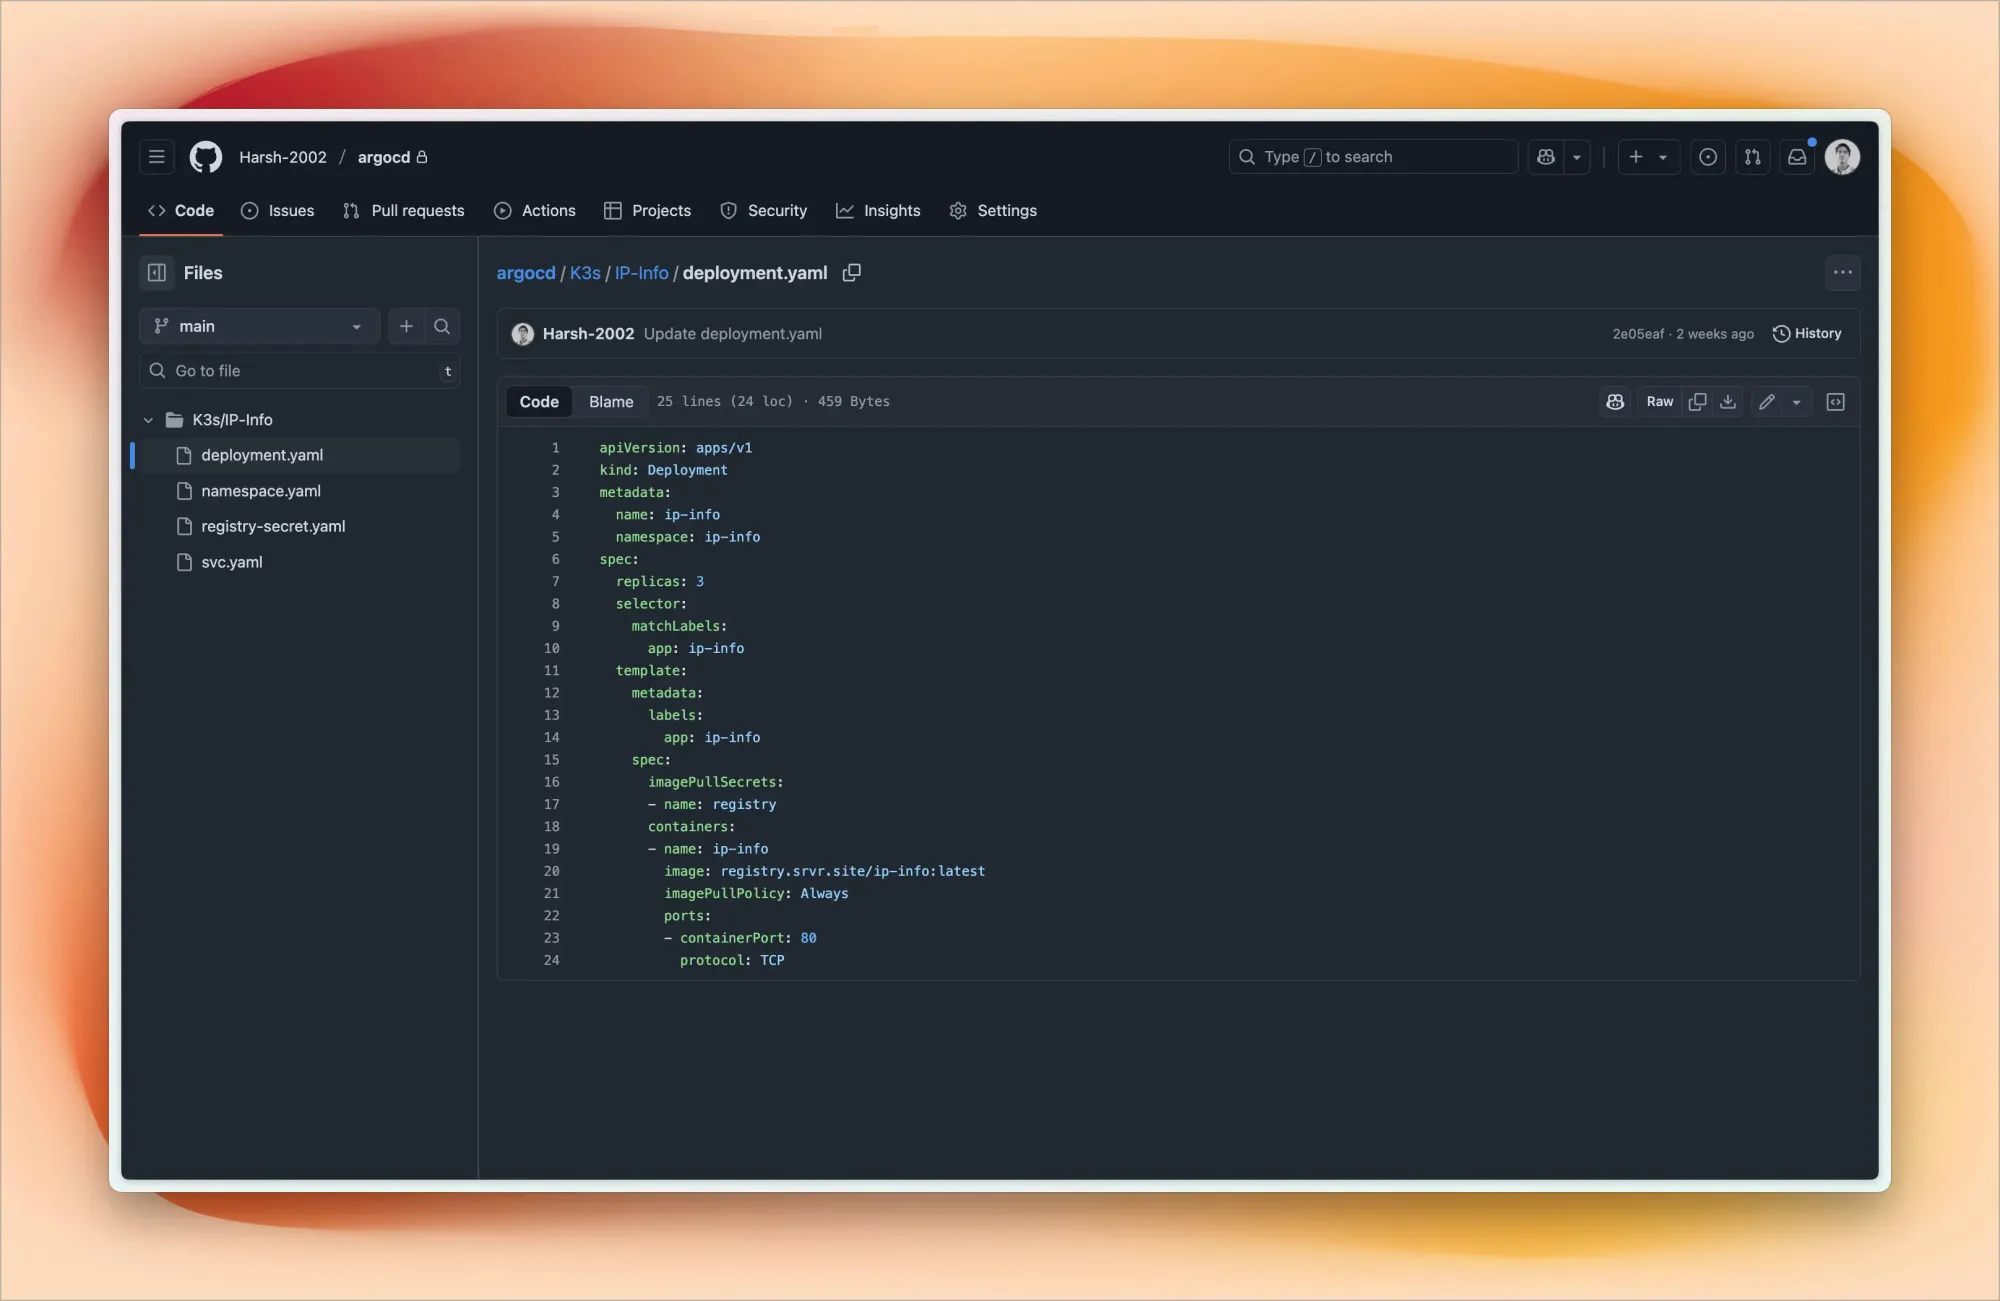
This is where my setup gets really exciting. I practice GitOps using ArgoCD connected to my private GitHub repository.
My ArgoCD repo structure looks like this:
argocd/
├── Project-1/
│   ├── deployment.yaml
│   └── svc.yaml
├── Project-2/
└── Project-3/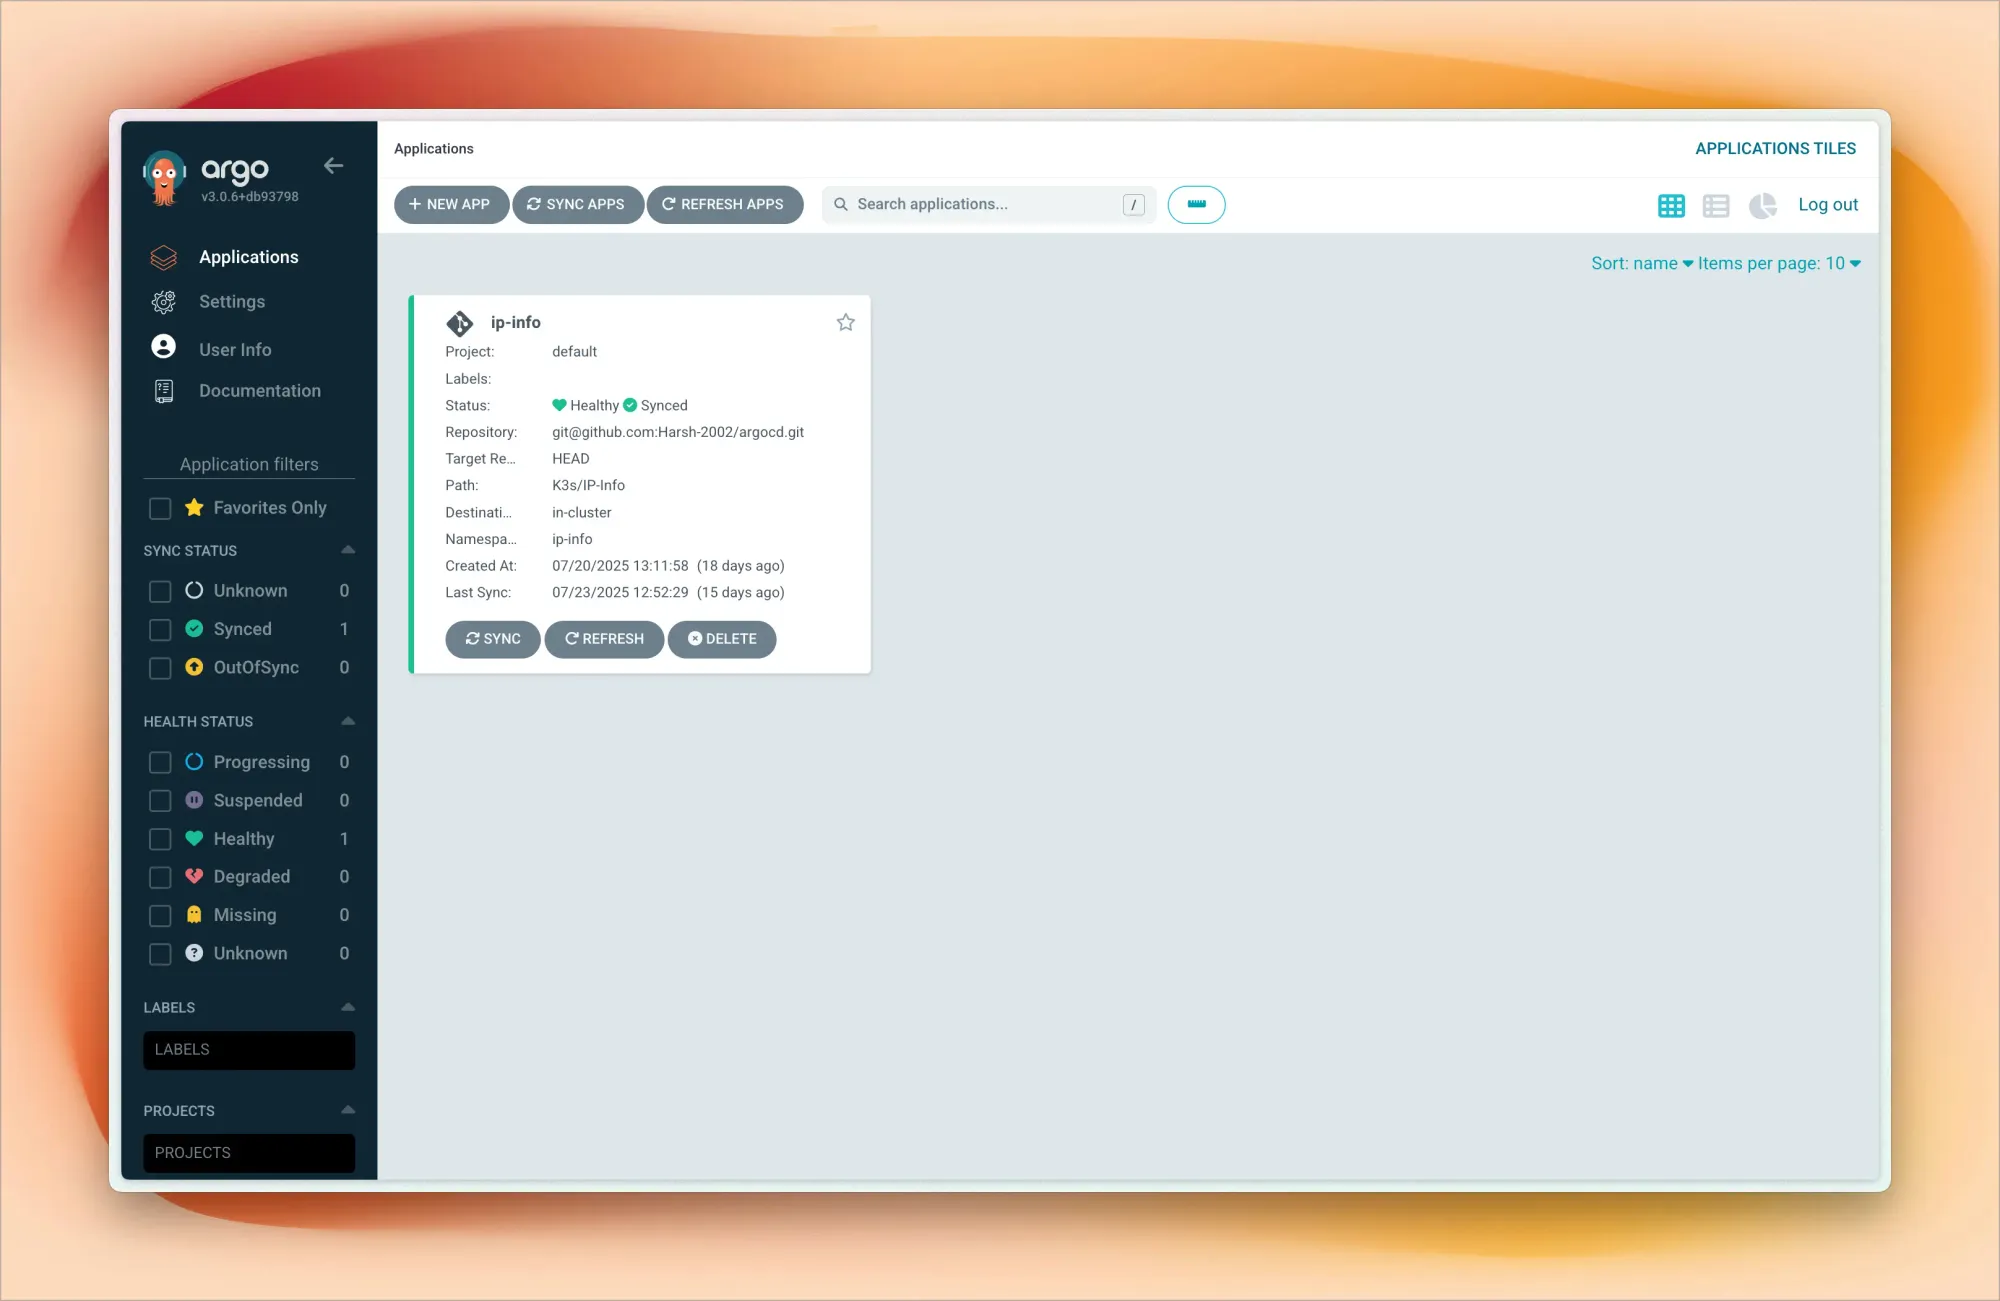
Each project folder contains Kubernetes manifests – deployments, services, ingress rules, config maps. When I push changes to GitHub, I sync Argo CD (though I'm planning to automate this with webhooks), and my cluster updates accordingly.
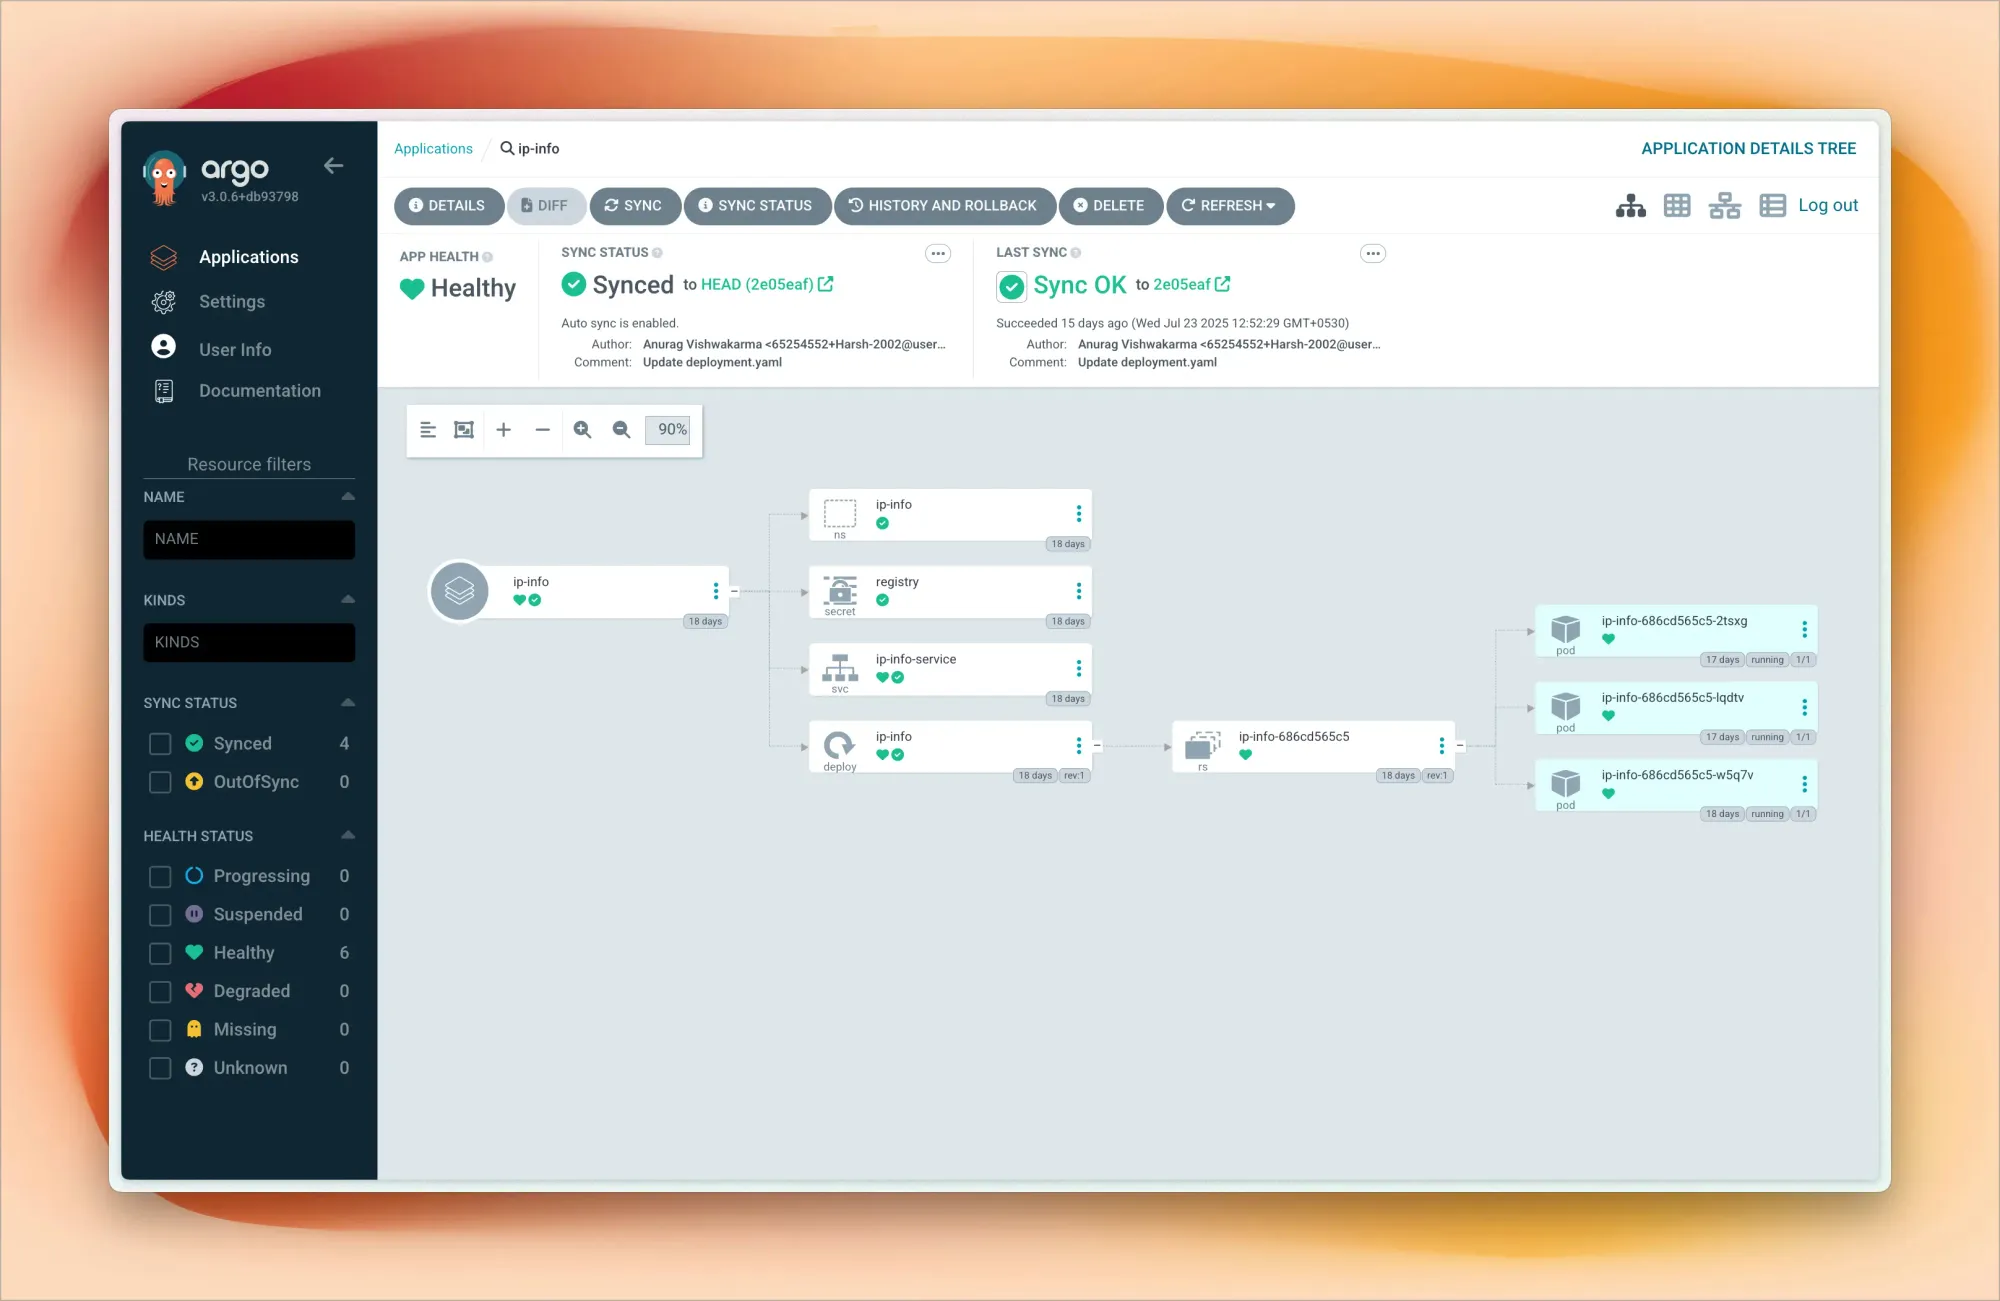
This workflow mirrors what I use professionally, giving me hands-on experience with modern deployment practices. I can experiment with blue-green deployments, canary releases, and rollback strategies in a safe environment.
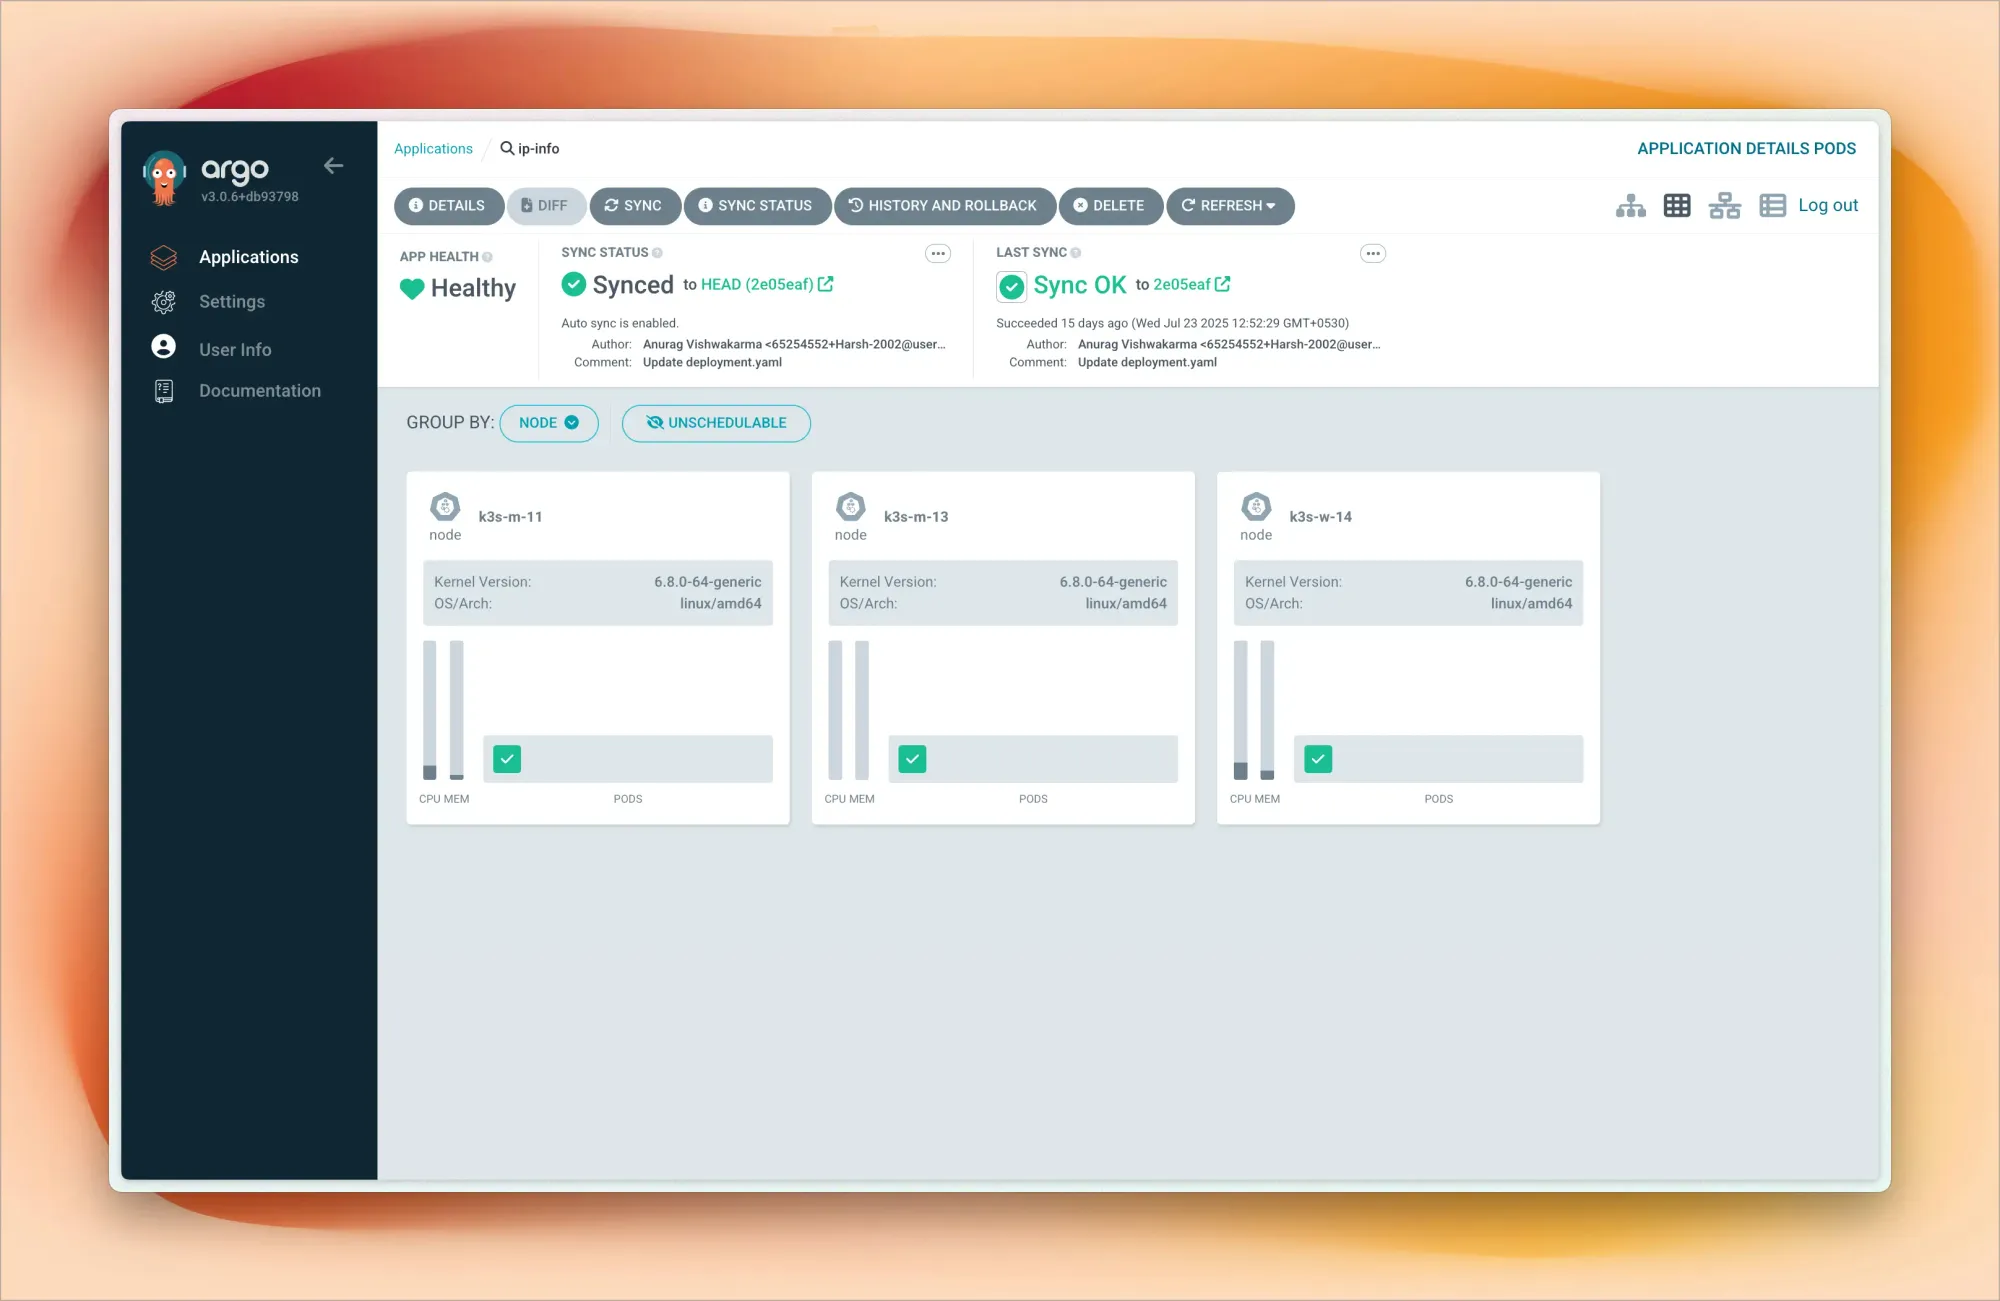
My Kubernetes networking uses Flannel for pod-to-pod communication across nodes. For exposing services, I primarily use NodePort, though I'm planning to implement MetalLB as a load balancer to get closer to production-like service exposure.
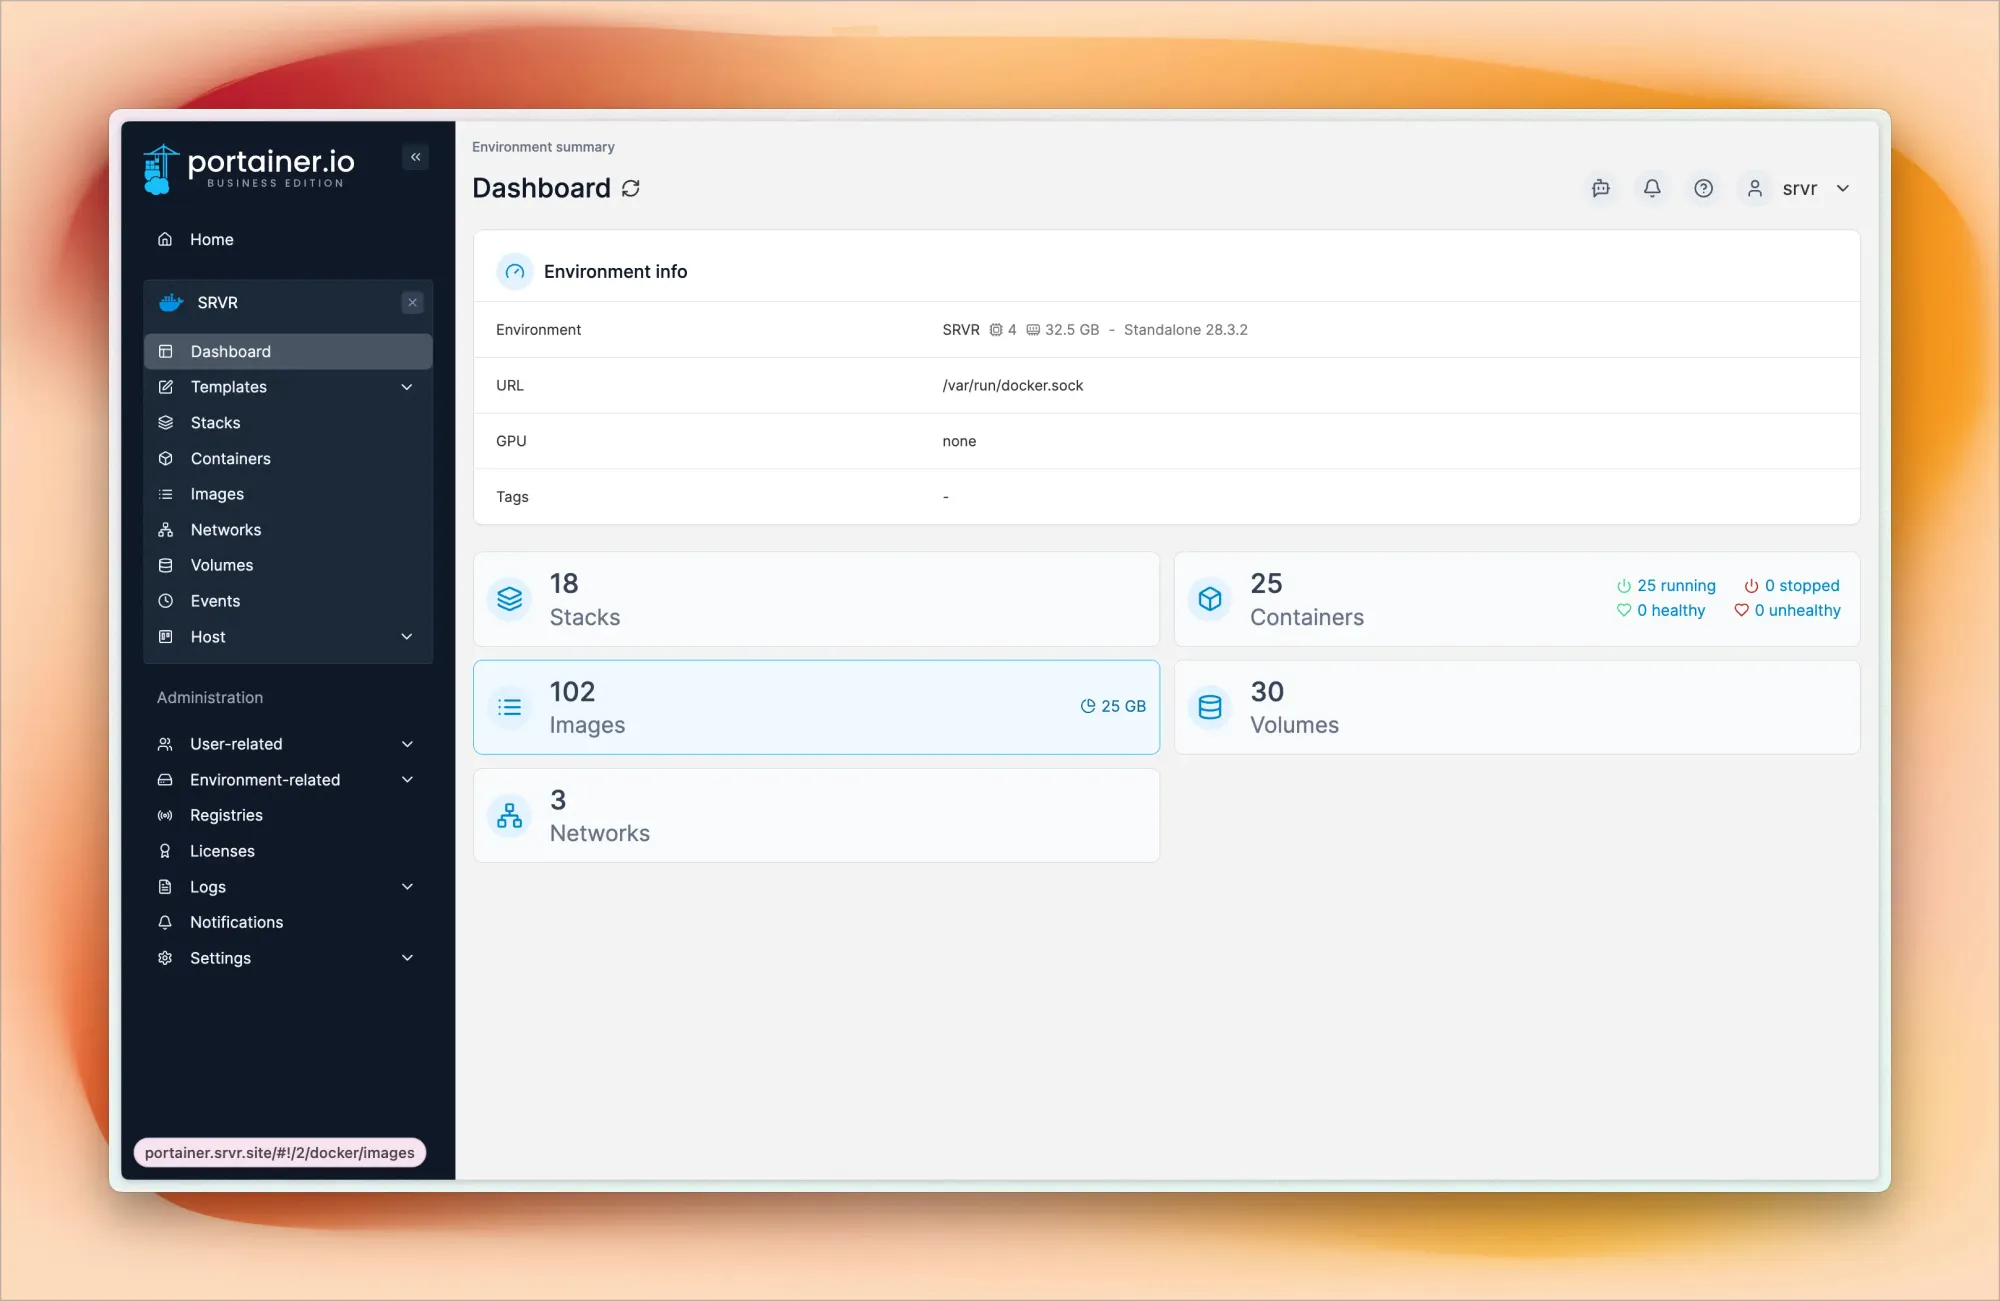
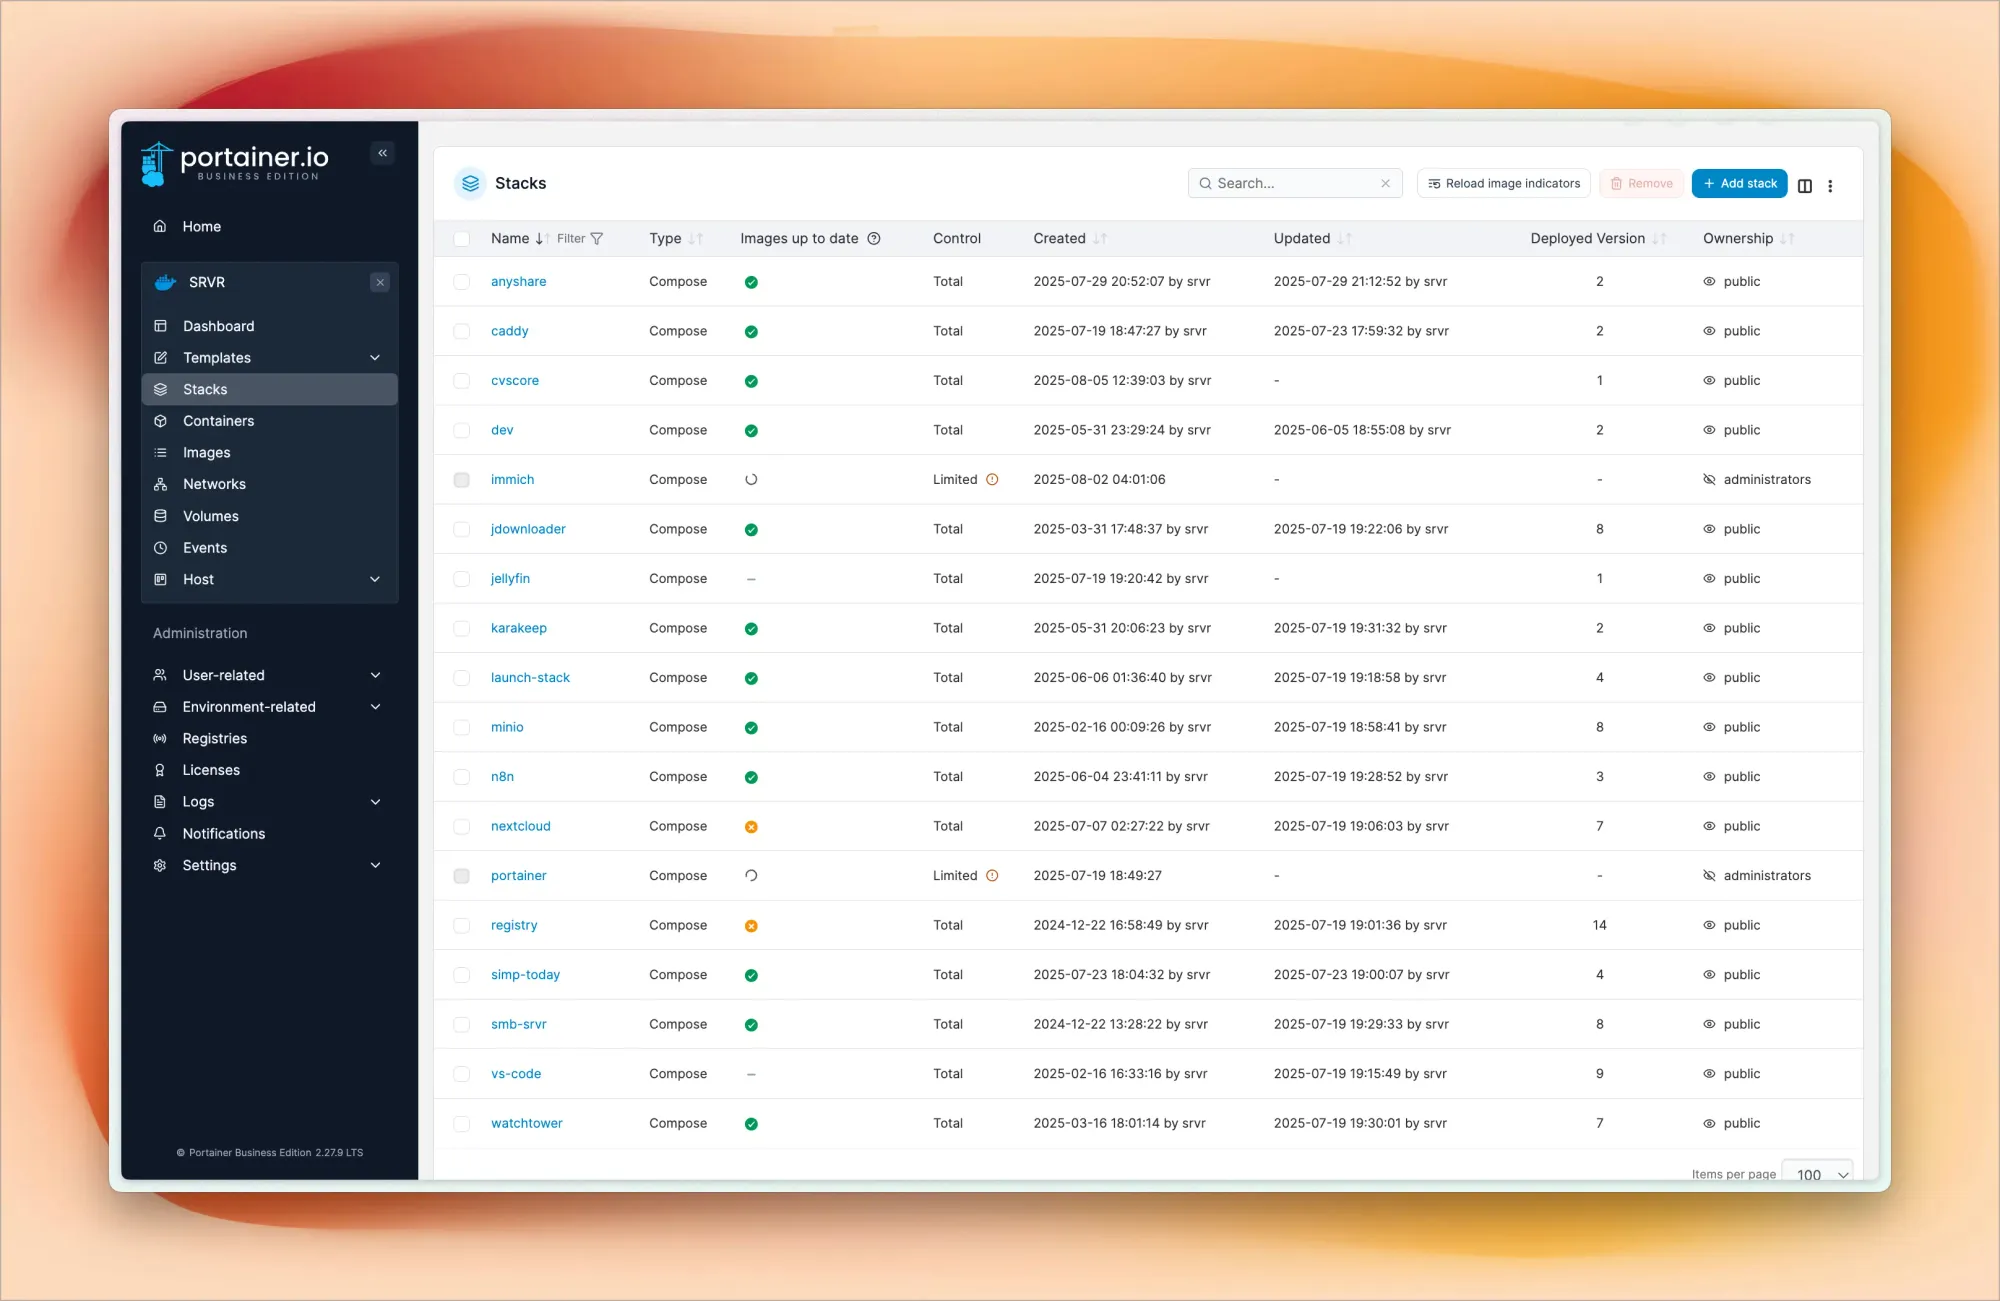
Docker and Container Management
While Kubernetes handles orchestration, I also run standalone Docker containers for services that don't need the full Kubernetes treatment.
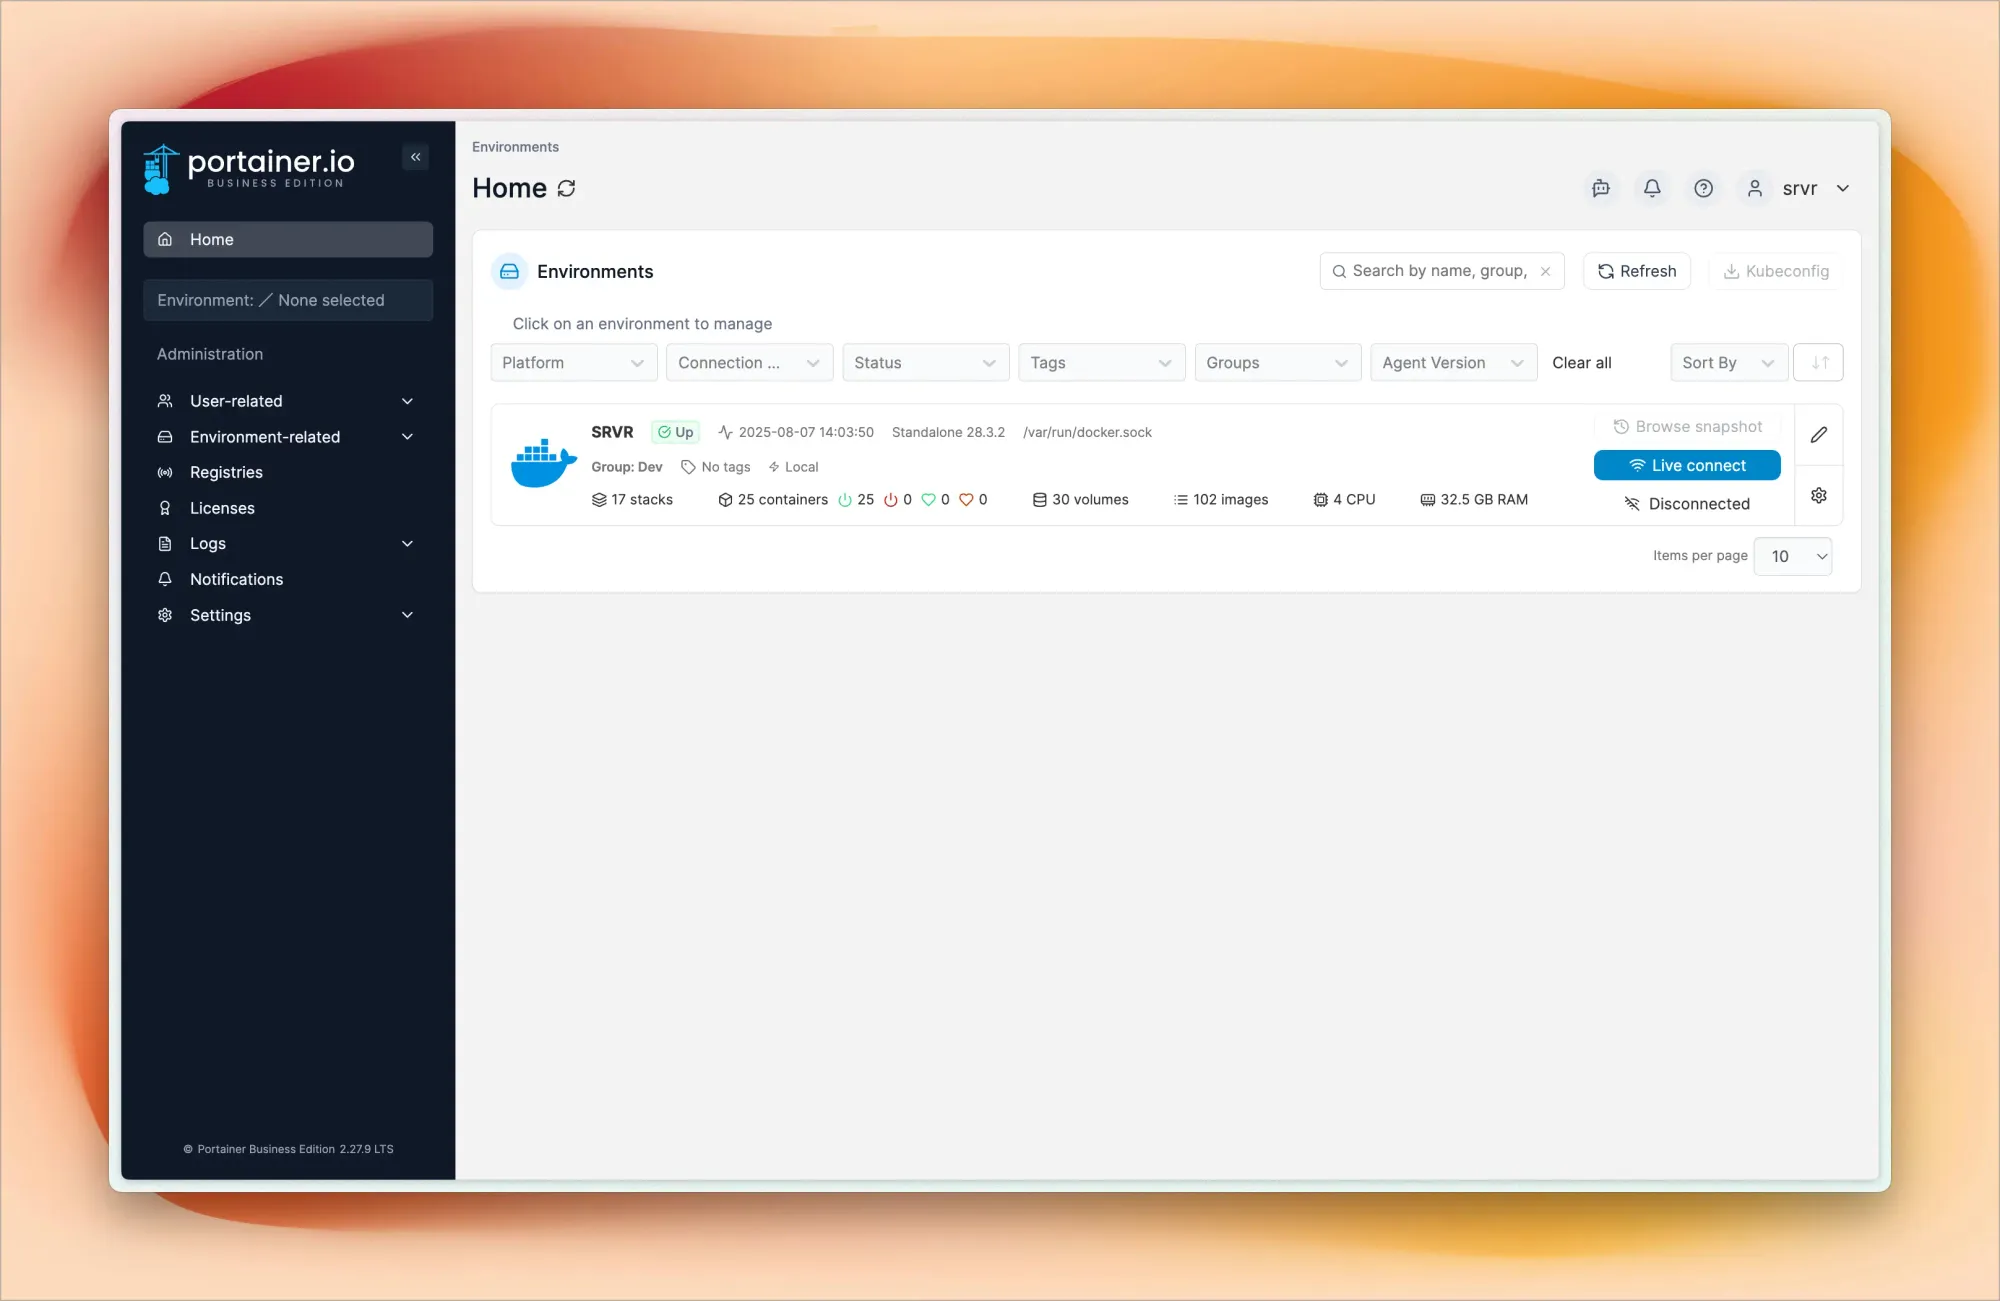
I use Portainer Business (free for individual users for one year) as my Docker management interface. It provides a web UI for managing containers, images, networks, and volumes. Through Portainer, I can quickly deploy new containers, monitor resource usage, check logs, and manage container lifecycles without dropping to the command line.
I've configured custom Docker bridge networks instead of using the default bridge. This gives me DNS resolution between containers – they can communicate using container names instead of IP addresses. It also provides network isolation and makes my reverse proxy configs much cleaner.
This setup makes my configurations much simpler – instead of hardcoding IP addresses, I reference containers by name, making everything more maintainable.
Exposing Services to the Internet
Getting my services accessible from the internet involves several layers. My TP-Link router handles port forwarding, directing incoming HTTP (80) and HTTPS (443) traffic to my Dell OptiPlex server. Having a dedicated public IP really helps here – no double NAT complications.
This is where Caddy comes in. I compiled Caddy with the Cloudflare DNS plugin to handle automatic SSL certificate provisioning and renewal through Let's Encrypt.
Here's how it works:
- Caddy uses my Cloudflare DNS API token to create TXT records for domain validation
- Let's Encrypt validates domain ownership and issues certificates
- Caddy handles certificate renewals automatically before expiration
- Based on the domain/subdomain, Caddy routes traffic to appropriate backends
Final Caddyfile looks something like this:
{
	email {env.EMAIL}
#	acme_ca https://acme-staging-v02.api.letsencrypt.org/directory
    acme_ca https://acme-v02.api.letsencrypt.org/directory
	servers {
		protocols h1 h2 h3
	}
	admin off
	storage file_system {
		root /data
	}
	log {
		level DEBUG
	}
}

(tls_config) {
	tls {
		dns cloudflare {env.CLOUDFLARE_API_TOKEN}
	}
	header {
		Strict-Transport-Security "max-age=31536000;"
		X-Content-Type-Options "nosniff"
		X-Frame-Options "DENY"
		Referrer-Policy "strict-origin-when-cross-origin"
	}
}

cvscore.srvr.site {
    import tls_config
    reverse_proxy cvscore-dev:3000 {
        header_up X-Forwarded-For {remote_host}
        header_up X-Real-IP {remote_host}
    }
}

share.srvr.site {
        import tls_config
        reverse_proxy anyshare:3000
}

ip.srvr.site {
    import tls_config
    reverse_proxy http://10.1.1.15:30010
}

falcon.srvr.site {
    import tls_config
    reverse_proxy http://10.1.1.20:4000 {
        header_up X-Forwarded-For {remote_host}
        header_up X-Real-IP {remote_host}
    }
}

dev.srvr.site {
    import tls_config

    handle_path /api/* {
        reverse_proxy 10.1.1.20:4000
    }

    handle {
        reverse_proxy 10.1.1.20:3000
    }
}

ghost.srvr.site {
    import tls_config
    reverse_proxy http://10.1.1.20:2368
}

my.srvr.site {
    import tls_config

    header {
        -X-Frame-Options
        X-Frame-Options "SAMEORIGIN"
    }

    handle {
        reverse_proxy https://10.1.1.10:9090 {
            transport http {
                tls_insecure_skip_verify
            }
            header_up Host {host}
            header_up X-Forwarded-Proto https
            header_up Upgrade {http.request.header.Upgrade}
            header_up Connection {http.request.header.Connection}
            flush_interval -1
        }
    }
}


pi.srvr.site {
    import tls_config

    header {
        -X-Frame-Options
        X-Frame-Options "SAMEORIGIN"
    }

    handle {
        reverse_proxy https://10.1.1.100:9090 {
            transport http {
                tls_insecure_skip_verify
            }
            header_up Host {host}
            header_up X-Forwarded-Proto https
            header_up Upgrade {http.request.header.Upgrade}
            header_up Connection {http.request.header.Connection}
            flush_interval -1
        }
    }
}

monitor.srvr.site {
        import tls_config
        reverse_proxy 10.1.1.100:8090
}

argo.srvr.site {
    import tls_config
    reverse_proxy https://10.1.1.11:30443 {
        transport http {
            tls_insecure_skip_verify
        }
    }
}


drive.srvr.site {
    import tls_config
    reverse_proxy https://nextcloud:443 {
        transport http {
            tls_insecure_skip_verify
        }
    }
}

launch-stack.srvr.site {
        import tls_config
        reverse_proxy launchstack:3000
}

dm.srvr.site {
        import tls_config
        reverse_proxy jdownloader:5800
}

n8n.srvr.site {
        import tls_config
        reverse_proxy n8n:5678
}

registry.srvr.site {
        import tls_config
        reverse_proxy registry:5000
}

minio.srvr.site {
        import tls_config
        reverse_proxy minio:9001
}

s3.srvr.site {
        import tls_config
        reverse_proxy minio:9000
}

pin.srvr.site {
        import tls_config
        reverse_proxy karakeep:3000
}

code.srvr.site {
        import tls_config
        reverse_proxy code-server:8443
}

dns.srvr.site {
	import tls_config
	reverse_proxy 10.1.1.100:3000
}

photos.srvr.site {
        import tls_config
        reverse_proxy immich-server:2283
}

media.srvr.site {
        import tls_config
        reverse_proxy jellyfin:8096
}

portainer.srvr.site {
    import tls_config
    reverse_proxy https://portainer:9443 {
        transport http {
            tls_insecure_skip_verify
        }
    }
}

# Dynamic Proxy

*.srvr.site {
    import tls_config
    reverse_proxy {labels.2}.docker:5678
}

#Simp Today
(tls_config_simp) {
    tls {
        issuer acme {
            email {env.EMAIL_SIMP}
            dns cloudflare {env.CLOUDFLARE_API_TOKEN_SIMP}
        }
    }
    header {
        Strict-Transport-Security "max-age=31536000;"
        X-Content-Type-Options "nosniff"
        X-Frame-Options "DENY"
        Referrer-Policy "strict-origin-when-cross-origin"
    }
}

simp.today {
    import tls_config_simp
    reverse_proxy simp-frontend:80
}

api.simp.today {
    import tls_config_simp
    reverse_proxy simp-backend:3001
}
Caddyfile
For Kubernetes services, I use NodePort exposures and route to the appropriate node and port combination. This gives me production-like HTTPS endpoints for all my services without manual certificate management.
When someone accesses my services, the request flows like this: DNS resolves to my public IP, hits my router on port 443, router forwards to Caddy, Caddy terminates SSL and routes to the appropriate container or Kubernetes service.
What I'm Actually Running
My home lab runs real services that I use daily, making the investment worthwhile beyond just learning.
AdGuard Home runs on my Raspberry Pi as both my home DNS server and network-wide ad blocker. I've configured multiple blocklists that filter ads, trackers, and malicious domains for every device on my network. Sometimes it blocks 30-40% of DNS queries!
Jellyfin is my personal media server – think Netflix, but completely under my control. I can stream my media collection to any device, anywhere (thanks to Tailscale), with transcoding capabilities.
Immich provides AI-powered photo organization and face recognition, like Google Photos but self-hosted. It's connected to my MinIO storage backend for a complete photo management pipeline.
MinIO serves as S3-compatible object storage. This gives me backend storage for applications like Immich and a testing ground for any projects that need S3 integration, all without AWS costs.
Beszel is my lightweight monitoring solution that keeps tabs on all my nodes – both local and remote. It provides system metrics and dashboards without the complexity of a full monitoring stack.
What This Has Taught Me
Every component of this setup has taught me something valuable. I've learned about networking, from subnetting to DNS to reverse proxies. Security concepts like certificate management and network segmentation. Automation through GitOps workflows and infrastructure as code. Monitoring and observability. And lots of troubleshooting, because something always breaks at 2 AM.
The best part? These skills directly translate to my professional work. Concepts I experiment with at home often help me solve complex problems at work.
What's Next
I'm already planning the next phase of my setup like adding more Raspberry Pi nodes for edge computing experiments, implementing a proper monitoring stack with Prometheus and Grafana, setting up a CI/CD pipeline, and experimenting with service mesh technologies.
The beauty of a home lab is that it's never truly finished. There's always another technology to explore, another problem to solve, another optimization to implement. And unlike those scary cloud bills, the only limit is your imagination (and maybe your electricity bill).
If you're considering building your own home lab, my advice is simple: start small, start now, and prepare to be obsessed.